

Here’s How To Increase The Visual Quality Of PC VR Games When Using Meta Link In Under 2 Mins To Get The Most Out Of The Meta Quest Screen! (Updated)
When Meta rolled out its game-changing feature called ‘The Meta Link’, it took the entire VR Industry by storm and made the Meta Quest a true ‘All-in-one’ VR Headset. (see article)
The Meta Link allows Quest owners to play full-blown PC VR games on their Meta Quest headset. However, the image quality degrades significantly.
So, in order to increase the image quality of PC VR games follow these simple steps that will take you no more than 2 minutes.
“Increase the image quality of PC VR games”
A MUST Read: Meta Link V/S Virtual Desktop – Which One Is Better? And Why?
4 Easy Steps: How To Use Meta Link With Any Quest Headset!
Meta Link: Which USB Cable To Choose?
To get started, it is recommended to choose a quality USB 3.0 cable to obtain a sufficiently high speed.
Meta of course offers its own model, however, it is possible to find other USB cables much cheaper and just as powerful.
Here are some alternatives:
- Anker USB C Cable, Powerline USB 3.0 to USB C Charger Cable (10ft)
- KIWI design Link Cable for OcuMeta Quest, 10 Feet/3m USB C 3.2 Gen1 Cable
- Quest Link Cable 16ft, VOKOO Meta Quest Link Cable
Quality And Functionality Of The Meta Link
To fully understand what’s happening, imagine the image in the Meta Quest like a video of the game playing on your computer.
To make sure it reaches your VR headset super fast, they compress the video. But, this compression makes the picture a bit worse. It gets a little blurry, and the colours aren’t as bright and accurate.
You can see the changes more clearly if you compare pictures from the game Half-Life: Alyx – one from the original source and one from the Meta Link version. We’ve zoomed in on them to make it easier to see the differences
Meta Link: How To Improve The Quality?
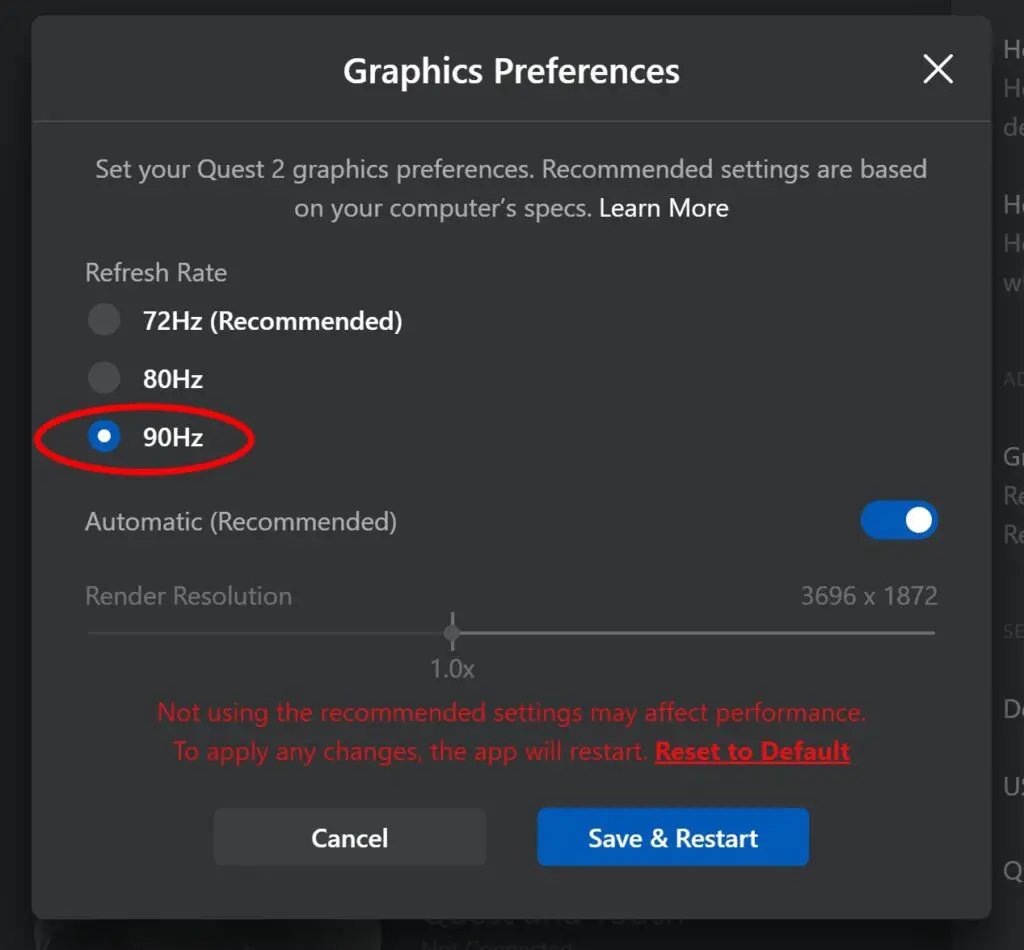
Since v23, the Meta PC application has provided additional settings for the Meta Link. To display them, go to the “Devices” menu, select “Quest 2 and Touch” then in the right pane click on “Graphics preferences“.
From there, depending on your PC configuration, you can start to change some parameters starting by switching the frequency from 72 Hz to 80 Hz, or even 90 Hz which will bring more comfort.
On the other hand, to get a finer image, you can increase the “Render Resolution” slider up to 1.2 (3920 x 1984). It is of course possible to push this setting further, however, be sure to monitor the latency which may gain traction.
And note that Meta does not recommend going beyond 1.6.
How To Use The Meta Debug Tool
If the image now gains somewhat in sharpness, the most observant will notice that the compression effect remains present.
The reason for this is Facebook’s limitation on bandwidth. Normally, this limit is around 150 Mbps. But don’t worry, you can change this limit using a tool called the Meta Debug Tool
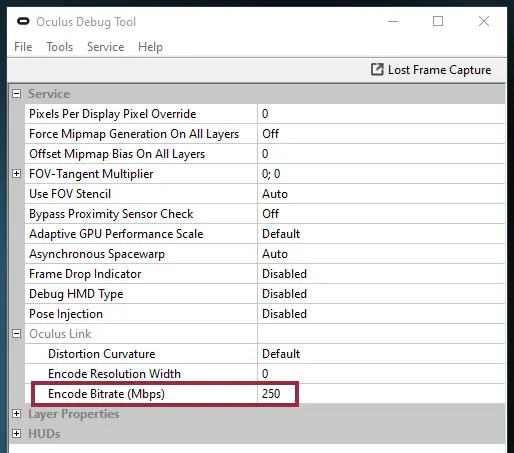
The tool is located in the Meta application installation folder on PC, by default: "C:\ Program Files\Oculus\Support\oculus-diagnostics\ OculusDebugTool.exe".
A must-have for hackers, the Meta Debug Tool once made it possible to modify the graphics preferences mentioned in the previous paragraph before they officially appear in the application.
Now, let’s focus on something important: ‘Encode Bitrate (Mbps).’
It’s a crucial setting because it helps prevent the picture from getting worse due to compression. But remember, the right value depends on how powerful your PC is.
At 250 Mbps, you’ll notice a big improvement in the picture quality, making things much clearer. If everything runs smoothly without any interruptions, you can try going up to 300/350 Mbps.
Although it’s possible to go as high as 500 Mbps, you won’t really see much difference, and it might even increase the time it takes for things to happen in the game.
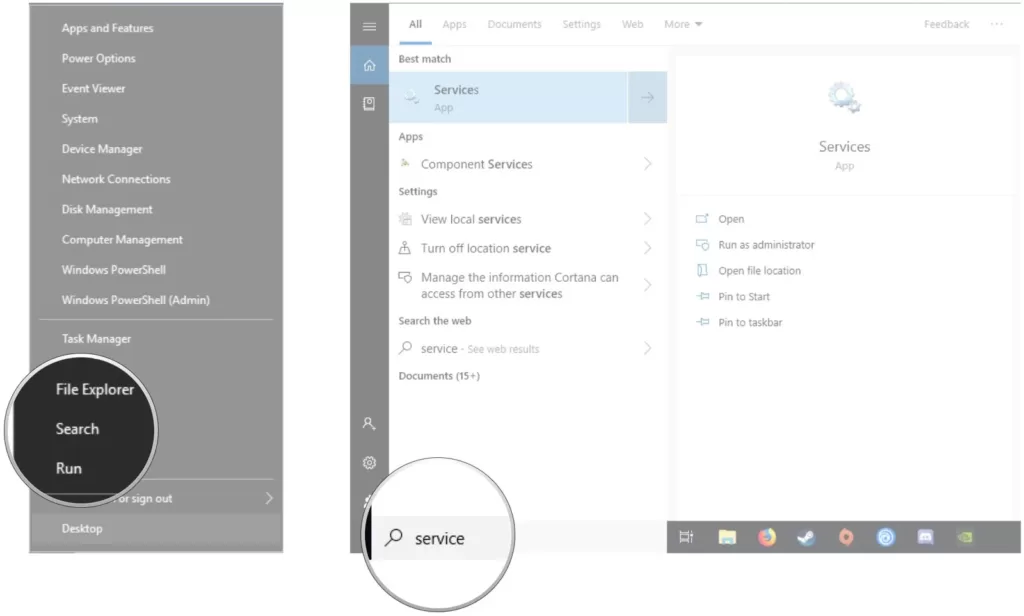
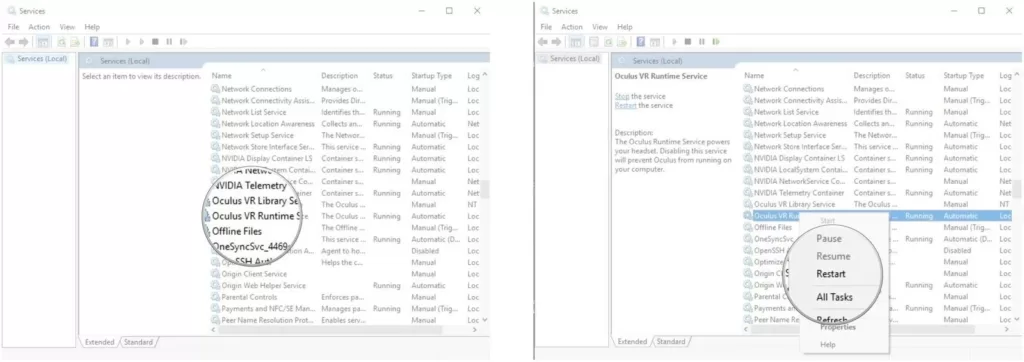
For these changes to work properly, you’ll need to restart the Meta app each time you make an adjustment. To make it easier, you can click on ‘Restart Meta Service‘ in the Service menu.
- Right-click Meta Runtime Service.
- Click Restart. It will likely take a moment to finish
So that’s how you can Increase the Meta LINK Image Quality Of PCVR on your Meta Quest Headset.
If you have any problems then comment down below, we will reply as fast as lightning.
Until then Stay Strong VR Army!
Suggested:
META QUEST GIFT CARD: How, Physical, Amazon (A to Z Guide)