

Oculus Quest And Quest 2: Record And Improve Video Capture Quality
To record VR gameplays on Oculus Quest and Quest 2 is very easy but the end result is far from reaching the quality standards. That’s why, we’ll show you how to get the most out of your virtual reality headset in order to get the best quality for your videos.
Capturing VR game gameplays and sharing them on social networks or YouTube has become something particularly common today.
There are currently several methods for capturing your own game videos. It is quite possible to record the VR headset gameplay via oculus.com/casting, AirReceiver etc.
However, in this tutorial, we will focus exclusively on the gameplay captured directly from an Oculus Quest and an Oculus Quest 2.
“Make YouTube Quality VR Videos From Your Quest”
A MUST Read: Top 25 Best Oculus Quest Multiplayer VR games – Co-op, Team VR Games
How To Record Your Games With An Oculus Quest?
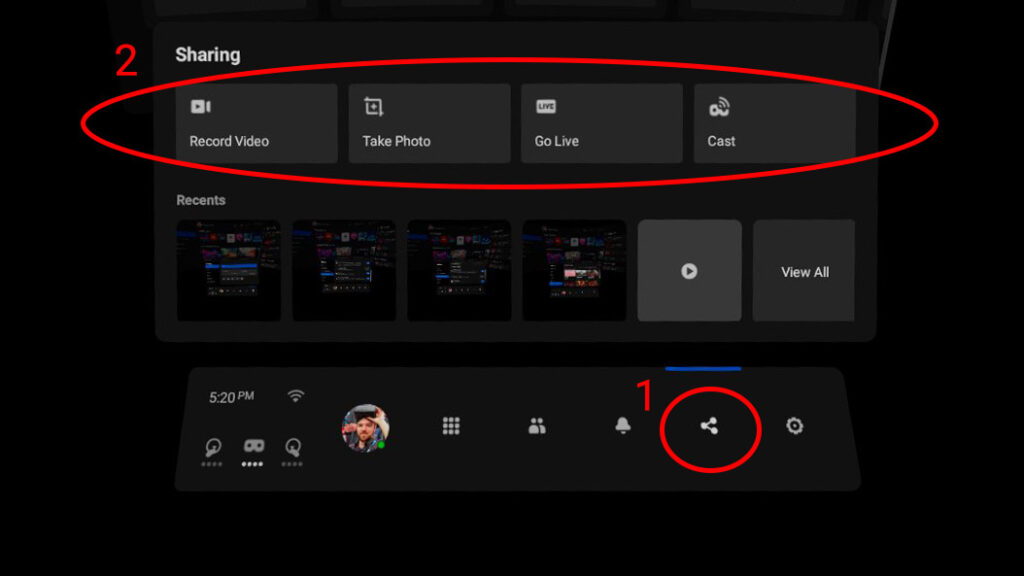
To start a recording on Oculus Quest and Quest 2, simply go to the “Sharing” menu at the bottom right and select “Record a video”.
To indicate that the recording is in progress, a red dot at the top of the screen appears. If this indicator bothers you, know that it is possible to remove it.
To make it disappear, the option is in “Settings” then “Device”. In this menu, just turn off “Video Capture Indicator” and you’re good to go.
Where Are Your Recorded Videos? And Features Of Original Videos
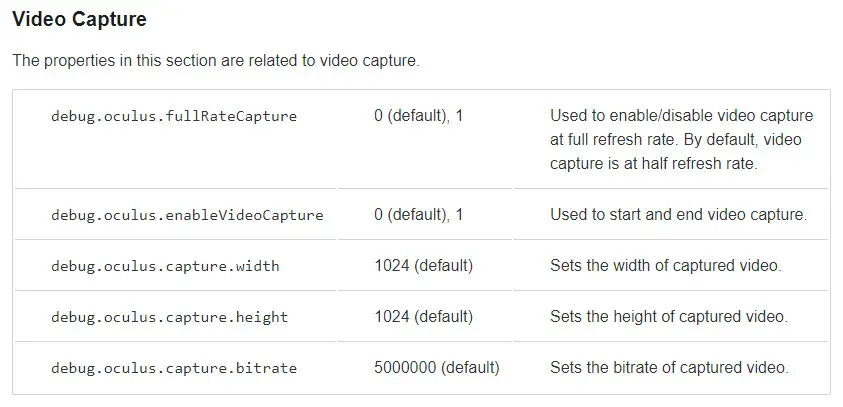
By default, the files are in the format 1024 x 1024 in 30 fps with a bitrate of 5 Mbit/s. Values that are naturally found on the Oculus site:
While the square ratio can be useful on social media, it probably won’t work for some YouTube channels.
Fortunately for the supporters of the 16/9 ratios, these original values can be modified in order to obtain nice videos in 1920 x 1080 format and up to 60 fps for those who want it.
Suggested:
Oculus Air Link: How To Play PCVR Games on Quest 2 WIRELESSLY
Oculus Quest: How To Change The Video Recording Quality?
To be authorized to modify the original settings of your Oculus Quest or Quest 2, you must switch your virtual reality headset to developer mode and download the SideQuest application.
If you’re not familiar with side loading and side quest and want to Sideload Sidequest games and apps for yourself, it’s effortless to get it all set up.
So I’ve linked a couple of tutorials on how to start sideloading. It takes maybe five to ten minutes max to get it all ready to go.
Step 1: Modify The Resolution Of The Videos:
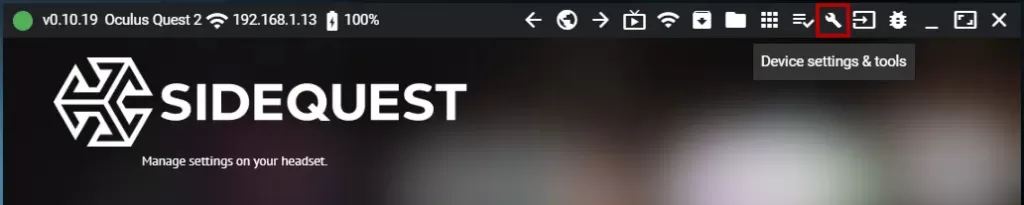
Now that your VR headset is connected to your PC, make sure that it is also recognized by SideQuest (green indicator on the left).
You must then go to the “Device settings & tools” menu located at the top right of the application:
This opens up a host of options of all kinds. In this list, we will focus on just two of them. The first is “Set Video Capture Size”.
This option will allow you to change the square format of the original video capture.

You will thus be able to choose between three aspects by simply clicking on it; 480p, 720p or 1080p, which is what we recommend.
A message will appear on a green banner to let you know that the change has been taken into account.
Suggested:
How to Use SideQuest WIRELESSLY On Oculus Quest 1 & 2 – (WIN & MAC)
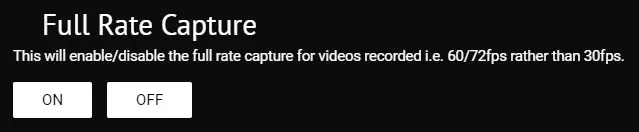
Step 2: Increase Frame Rate
This step is only necessary if you want to deliver smooth videos with 60fps.
If so, you are going to need the “Full Rate Capture” option. By clicking on “ON”, the video recording frequency can then increase to reach 90 fps.
There are, however, two conditions for achieving such frequency. The first is of course to be in possession of an Oculus Quest 2 and the second is to have an optimized application or game capable of running at 90 Hz.
Otherwise, as with the first Oculus Quest, the capture will not exceed 72 fps.
But whether the result is 90 or 72 fps is really too little importance. Indeed, once exported to your social networks, the video will ultimately be shared in 60 fps.
On the other hand, it is important to emphasize that once the full rate capture is activated, display problems can occur.
On the Oculus Home, for example, slowdowns will appear, but the capture is not affected.
In most cases, this problem disappears completely after launching an application. However, some tracks like Beat Saber retain them and can greatly hinder the experience.
Step 3: Improve The Capture Quality By Changing The Bitrate:
With videos now in 1080p, the flaws related to compression will now be much more noticeable in the images.
This is normal since the data rate set at 5 Mbit/s no longer really corresponds to the new definition.
The next and last step consists of increasing the bitrate, which will have the consequence of significantly changing the quality of the videos.
To do this, select the “Run ADB commands” in the Sidequest menu this time, then click on “ENABLE USB ADB”:
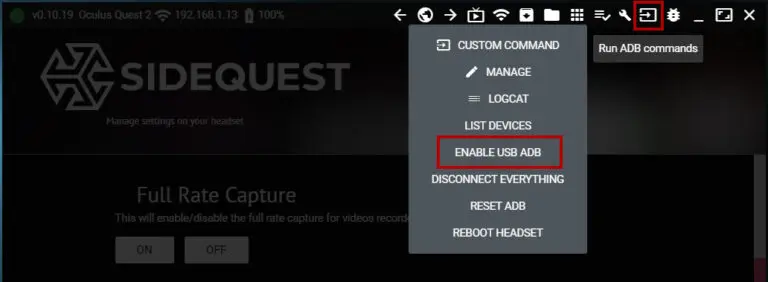
The menu that has just appeared should be used with caution because it allows you to change all of the original settings of an Oculus Quest.
Thus, to increase the bit rate of the video capture, we will have to use and change the “debug.oculus.capture.bitrate” command visible in particular in the table on the Oculus site mentioned previously:
The default recording value is “5000000” which corresponds as we have seen to 5 Mbit/s. Of course, the larger the number, the greater the flow will be.
But if at 30,000,000 the image will undoubtedly remain sharper, the recording will however be unstable and risk causing the Oculus Quest to crash. Moreover, a higher bitrate also means videos that will take up more space in your device.
On this point, it is also very important to know that files close to and over 4 GB will be corrupted and cannot be used.
This is actually due to a limitation of the FAT32 format that the VR headset depends on. As a consequence of this, you are going to have to limit your recordings by trying not to border on 4 GB. Usually, you get close to it from 18 – 20 minutes of capture.
Let’s come back to change the Bitrate of our video, what we noticed after several tests were that “20,000,000”, or 20 Mbit/s, was a good compromise between performance and quality.
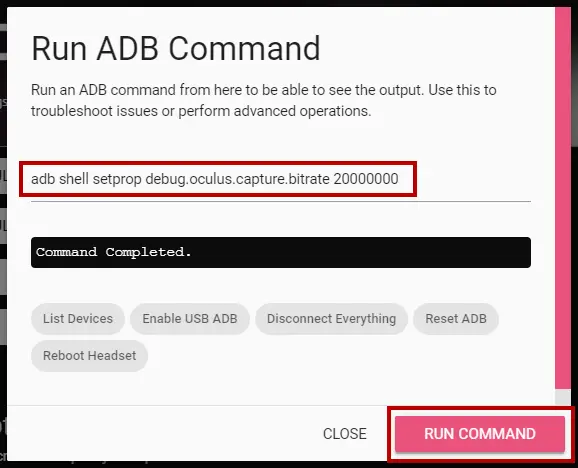
To obtain this new bitrate speed, insert the following command as shown in the image opposite: adb shell setprop debug.oculus.capture.bitrate 20000000 and click on “RUN COMMAND”.
The message “Command Completed” will appear to confirm that it has been taken into account.
Once the three actions have been performed, you can freely disconnect your virtual reality headset and use it normally.
The registration procedure remains of course the same. You can revert to factory settings at any time by simply restarting your Oculus Quest.
Suggested:
2 Methods – How To Play Skyrim VR On Oculus Quest 1 & 2
How You Will Record Your Voice?
Add to this that the speed is only 64 Kbit/s. Despite multiple community requests for stereo, Oculus is turning a deaf ear for the moment.
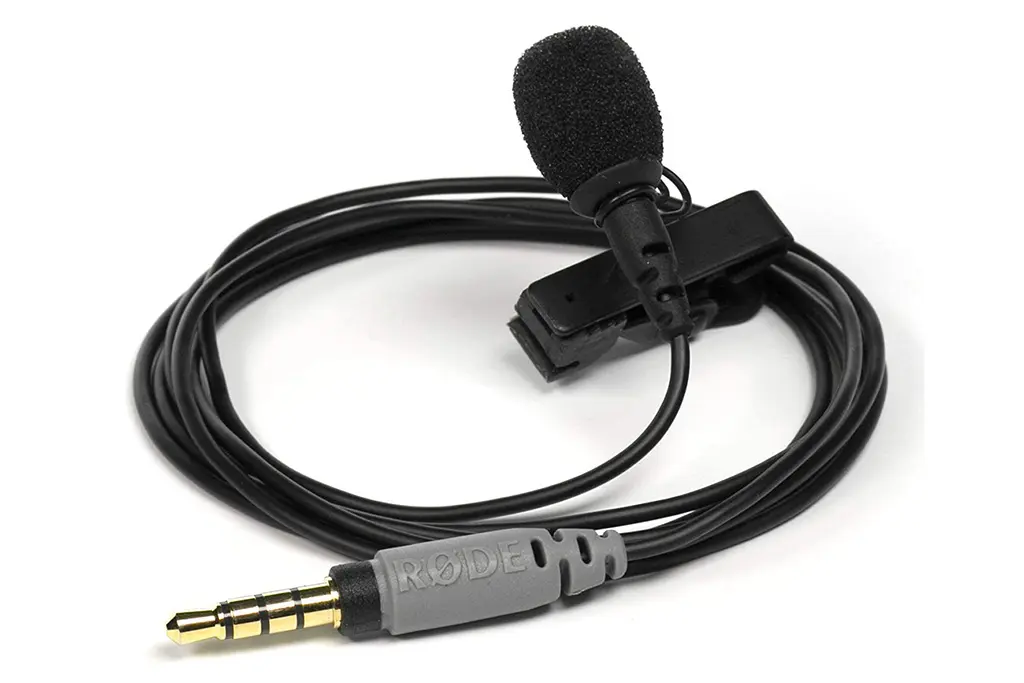
On the other hand, you will undoubtedly have noticed that it is impossible to record your voice from your VR headset.
On this point, you will have no other choice but to orient yourself towards an alternative solution to recover your voice individually.
For this, there are several wireless lavalier microphones such as the Rode Wireless Go to which you can add the Rode SmartLav microphone to improve the sound.
Finally, to finish, all you have to do is put everything together in video editing software.
Read Next:
How to Play Steam VR Games on Oculus Quest Wirelessly Using Virtual Desktop
So that’s how you can Record/Capture and Improve the Quality of your YouTube VR or other Social Media videos on your Oculus Quest 1 & 2.
So What did you think of this article? Do not forget to leave your comment.
Finally, if you are interested in the world of Virtual Reality, take a look at our other articles and go to our YouTube Channel and stay tuned for future tutorials
Suggested:
GTA 5 VR – How To Play GTA 5 In VR Officially On Oculus Quest 1 & 2